Monday, November 24, 2014

구글 스프레드시트 수식 사용하기


구글 스프레드시트는 우리가 많이 사용하는 엑셀과 같은 프로그램이다. 
수식을 사용할때, 대부분 다른 셀의 위치를 이용해서 표현하게된다. 이 셀주소의 표현 방법은 상대주소, 절대 주소로 표현할수 있다. 

1. 상대주소
상대주소의 경우 수식을 복사해서 다른 곳으로 이동하게 되면, 그 위치에 맞게 셀 주소값이 변경하게된다. 

예제) 셀 A2 와 셀 A3 를 더하는 수식 ==> A4 에서 A2 + A3 
만일 A4를 복사해서 다음 항목에 사용하는 경우 
B4 =>  "=B2 + B3"
C4 =>  "=C2 + C3"
D4 =>  "=D2 + D3"


2. 절대주소 
절대주소는 수식을 복사해도 셀주소가 고정되어 항상 같은 값을 참조하게 된다. 
셀의 절대주소 표현 방식은 $A$4 와 같이 행과 열 앞에 $기호를 붙여주면 된다. 


Wednesday, November 19, 2014

해외에서 카카오게임 설치하기


일반적으로 국가별 라이센스 정책에 따라서 해외에서는 한국 앱을 설치할수 없게 되어 있다. 
라이센스 방식이 애플 앱스토어와 구글 PLAY 가 다른 방식을 사용하고 있다. 

1. 애플 앱스토어 
애플 계정의 국가 설정에 따라 해당 국가의 앱만 다운로드 가능

2. 구글 PLAY 
사용자 단말의 IP 로 국가를 지정


다음 내용들은 안드로이드 사용자가 해외에서 구글 플레이를 통해서 한국의 앱을 다운로드 받아서 설치하는 방법이다. 

1. APK 를 직접 받아서 설치 

2. VPN서버를 통해서 한국 IP를 할당받고  구글 플레이를 이용해 앱 다운로드


자세한 방식을 추후 업데이트 하겠습니다. 

필기를 잘하는 아이

Tuesday, November 11, 2014

How to Connect to a VPN in Windows

How to Connect to a VPN in Windows


image
We’ve covered virtual private networks and when you might want to use them before. Connecting to a VPN is easy, as Windows and most other operating systems offer built-in VPN support.
Note that some VPN providers offer their own desktop clients, which means you won’t need this setup process. For example, TunnelBear and proXPN both offer their own desktop applications for connecting to their VPNs and selecting VPN server locations.

Windows 7

To connect to a VPN on Windows 7, press the Windows key and, type VPN, and press Enter.
image
Enter the address of your VPN provider in the Internet Address box. You can enter an address like vpn.example.com or a numerical IP address, depending on the server information your VPN provider gave you.
You should also enter a Destination name – this can be anything you like. It’s only used to help you remember which VPN connection is which.
image
Enter your login credentials on the next screen. Use the username and password your VPN provider gave you.
image
Windows will connect you to the VPN you configured. If you checked the “Don’t connect now” checkbox on the first screen, Windows will save the VPN connection so you can easily connect later.
image
Once connected, you can click the network icon in your system tray to view your VPN connections. While connected to a VPN, all your network traffic will be sent over it.
To disconnect from a VPN, click it and click Disconnect. You can then reconnect to it later by clicking it and selecting Connect. You can have multiple VPNs configured and switch between them in this way.
image
To delete a saved VPN connection, press the Windows key, type network connections, and press Enter. Right-click a VPN connection and use the Delete option.
image

Windows 8

Connecting to a VPN is a similar process in Windows 8. Press the Windows key, type VPN, click the Settings category, and select the same Set up a virtual private network (VPN) connectionoption as in Windows 7.
image
You’ll see the same VPN connection window on the desktop. Enter the address and name of your VPN.
image
You’ll then see the Networks pane appear. Select the VPN you added and click Connect.
image
Enter the username and password credentials your VPN requires and you can connect to the VPN.
image
To access the Network pane in the future, click the network icon in the system tray or open the charms bar, select Settings, and select Network.
image
To connect or disconnect from a VPN, select it in the Network pane and use the Connect or Disconnect buttons.
To remove a saved VPN connection, press the Windows key, type View network connections, select the Settings category, and click the View network connections option. Right-click a VPN Connection and select Delete to remove it.
image

MS Word 사용시 가로 페이지 추가 방법

Portrait is a vertical layout, and Landscape is a horizontal layout.

You can either insert section breaks manually at the top and the bottom of the page that you want in the other orientation, or you can select your text and allow Microsoft Word to insert the new sections for you.


Insert Section Breaks and Set the Orientation

I prefer to set my section breaks first and then set my orientation. I like to tell Microsoft Word where to break the page instead of letting Word decide for me. In order to accomplish this, I insert a Next Page Section Break at the start and end of the text, table, picture, or other object and then set the orientation.
Insert a Section Break at the beginning of the area that you want to rotate:
    1. Select the Page Layout tab.
    2. Click the Breaks drop-down menu on the Page Setup section.
    3. Select Next Page in the Section Breaks section.
    4. Repeat the above steps.
    5. Click the Page Setup Launcher button on the Page Layout tab, in the Page Setup group.
    6. Click Portrait or Landscape on the Margins tab in the Orientation section.
    7. Select Section in the Apply To drop-down list.
    8. Click the OK button.
끝. 


구글 블로거에 Categories 메뉴 추가하기

구글 블로거에 Categories 메뉴 추가하기

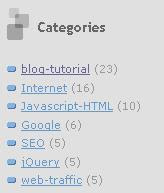
If you want to add categories to the blogger as in the picture, read the instructions in this post.
For example if you click on "Useful website" you will get a list of all the posts that are in category Useful website and if you click on the blog tutorial you will get all posts related to the blog tutorial.
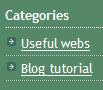


The purpose of adding a category is sort of articles by category. Adding a category of your blog becomes easier to browse.

You can write your own HTML to add category links one by one (take a look at topic Creating HTML with category list) or you can use Labels gadget (this is simple method).

Find more blogspot advices on this blog!


The process of adding categories

1. Creating a label for posts

First, you need to add a label posts. Label is added by entering text in the textbox which is located at the bottom of the screen for writing or editing posts (Potsting-->Create or Posting-->EditPosts, see picture).
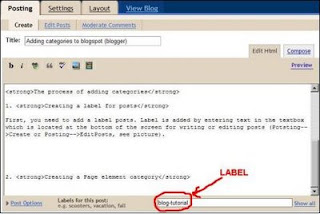


For example, I entered the label "blog-tutorial" for my post.

2. Creating a Page element category


You can use Labels gadget or write your own HTML to add category links one by one. Labels gadget is very simple to implement.


Adding Labels gadget to blog

1. Go to Layout.

2. Click on Add Gadget.


3. Select Labels Gadget
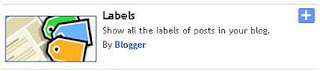

4. Enter title, chose to show all labels or only selected labels, sorting type. You can show number of posts per label by clicking check box and display labels as a list or cloud.
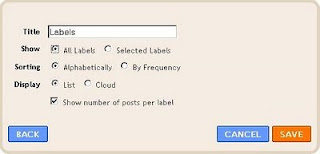


Result should look something like this: